Table of Contents
In this tutorial, you’ll go through easy steps for creating a realistic Apple LED cinema display using Photoshop.
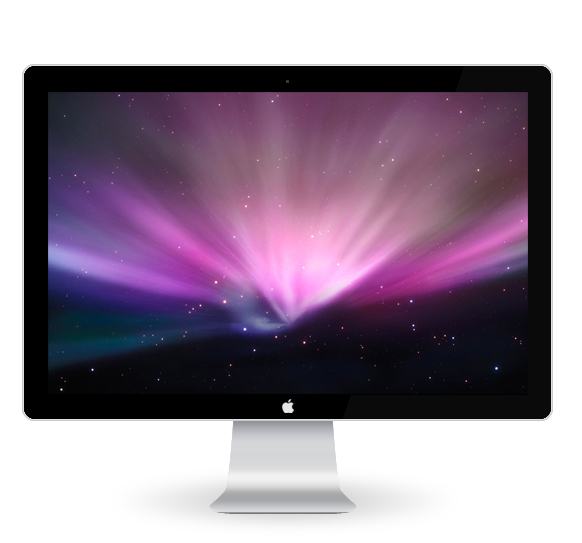
Take a look at the image we’ll be creating in this tutorial, which is a large Apple LED Cinema Display.
- Program: Adobe Photoshop CS3 or higher.
- Estimated Completion Time: 1.5 hours
Step 1
Create a new document and set the canvas to 652px by 543px. Set the background color to white. Create a new layer, name it frame. Then, select the rounded rectangle tool (U) from the toolbar and draw a 527px by 353px rectangle with 10px radius at the center of the canvas.

Step 2
Select the frame layer. Double-click on the layer’s thumbnail or go to Layer > Layer Style > Stroke. Now apply the following layer styles shown in the image.

After applying the layer styles it will look like this:

Step 3
Create a new layer, name it screen. Select the Rectangular Marquee tool (M) and draw a rectangle with 480px by 302px. Fill it with light sky color ( #55c5ea ). Now, create a new layer and place an image of your desire. I choose this. Select the image layer and press Control+T and stretch the image to 480px by 302px dimension. After placing the image delete the screen layer.


Step 4
Create a new layer, name it “reflection”. Select the Polygonal Lasso Tool (L) and make a trapezoidal selection around the right half of the screen.

Fill it with white. Deselect the selection. Now, Control+click on the frame layer thumbnail and click Add Vector Mask at the bottom of the layers palette or go to Layer > Vector Mask > Reveal all. Now select the layer mask thumbnail. Then, select Gradient Tool (G) from the toolbar, select black to white and draw a vertical gradient from down to up on the white reflection.


Now press V to select move tool. Select the reflection and reduce its opacity to 15%. Now it should be look like this.

Step 5
Now we have to put a pinhole webcam on the top of the frame. Create a new layer. Select the Elliptical Marquee Tool from the toolbar and draw an 180px by 180px circle. Fill it with white. Now press Control+T and stretch it to 3px by 3px. Reduce it’s opacity to 25%.

Step 6
Now we need to draw the support. Create a new layer, name it support and select Pen Tool (P) and draw a half stand like in the image. I’m doing it to make the sides of the stand same.

Now press Control+Enter to select the shape. Fill it with light grey (# d8d8d8). Deselect the selection. Now press Control+J to duplicate the layer. The press Control+T or go to Edit > Transform > Flip Horizontal. Now move it to the right and make the stand like this.

Now select the support layers and press Control+E to merge the layers. Now to go to Layer > Layer Style > Gradient Overlay. Now apply the following styles.


Now put the ˜support layer above the white background. After that, copy the layer two times under the ‘support layer. And then merge the copied layers. After that, apply the following layer styles to the merged layer.


Now it will look like this.

Step 7
Now we have to put an apple logo on the bottom of the frame. You can find it here. Open the image in photoshop. Go to Image > Mode > RGB color to unlock the layer. Now drag the image to the document. Create a new layer, name it logo. Now Control+click to the image layer thumbnail. Fill the marquee with white. Deselect the marquee. Reduce its opacity to 90% Delete the image layer. Now make it smaller and place it at the bottom of the frame as in the image below.

Step 8
To finish the display we need to draw the shadow to make it real. Select the elliptical marquee tool and draw a horizontal black ellipse, reduce its opacity to 70%. Now go to Filter > Blur > Gaussian Blur. Set it to 26. Then press Control+T and make it a little bit wider.


We can now declare that the design is finished.
Download Source File (.psd)

UI/UX Consultant, Photoshop, XD, SketchApp, Product Designer, Website Designer, Mobile App Designer, Expert WordPress Developer. For web/mobile design and wordpress development related projects please contact me at dibakar@themepurpose.com


